Hugelkultur: A New (Old) Approach to Raised Bed Gardening

In that vein, this year I have given up another 4 x 8 feet of condo yard to a raised edible garden, which will now house the formerly containerized raspberry, blueberries, tomatoes and peppers, with more veggies to be added once my seeds are ready to go outside. Being quite intrigued with the idea of "hugelkultur," a mounded gardening practice, I wanted to adapt that to the raised bed for 3 reasons. One, I was hoping to increase my planting space even more. Two, the soil in my yard is horrible and needed to be improved, and three, I wanted to save some money and muscle power by not having to purchase and transport roughly 30 cubic feet of planting medium.
While everything didn't exactly work out as I had wished, it seems that it will still have been a worthwhile effort. If you're planning a new veggie garden, my experience might help you out, so I'll explain the benefits and process of hugelkultur and how you can use it to best meet your needs, whether you're growing edibles or just plain pretty things.
Why Hugelkultur? Advantages
- Improved Soil Fertility: As the organic matter decomposes, it enriches the soil with nutrients, promoting healthy plant growth.
- Water Retention: The decomposing wood acts like a sponge, absorbing and retaining moisture, reducing the need for frequent watering.
- Temperature Regulation: Hugelkultur beds have better thermal mass, moderating soil temperatures and extending the growing season.
- Reduced Need for Fertilizers: The nutrient-rich soil created by hugelkultur reduces reliance on synthetic fertilizers.
- Minimal Weeding: Mulching helps suppress weed growth, minimizing the need for manual weeding.
- Longevity: Hugelkultur beds can remain productive for many years, requiring minimal maintenance.
- Enhanced Drainage: The raised bed structure promotes better drainage, preventing waterlogging and root rot.
- Biodiversity: The diverse microenvironments within the hugelkultur bed support a wide range of beneficial organisms, contributing to overall ecosystem health.
- No-dig possibility: Can be used directly on top of untilled ground if necessary.
- Increased Planting Space: Both sides of the mound may be planted, increasing the number of plants that can be grown within the same square footage.
Mind you, done in the traditional way involving long mounds up to 6 high, this is potentially something your city or neighborhood rule-making association is going to frown upon. In that case, you'll want to scale it down while retaining the basic principles. Fortunately, it adapts well to almost any raised bed growing plan.

Method of Hugelkultur Bed Building
- Before you do anything else you must collect your materials--the more you have, the larger the mound you can create. This can be done over the winter months as branches fallif you're building your bed in the spring. Ideally you will have a good supply of old logs as well branches and twigs for the base, leaves, and grass clippings or other "green" compostables.
- Chose a proper well-drained site--best in full sun if you are growing edibles. A good bed size is about 8x4--larger beds can be difficult to manage.
- If planting directly on the ground, cover existing grass with several layers of cardboard or several inches of wood chips before placing wood down. Otherwise, dig out a trench in the bed 12-18 inches deep, placing the removed soil on a tarp to be added back later. If doing this in a raised bed structure, you have the option to dig a shallower trench. You do want to be sure that the wood takes up no more than half the final height of the bed, and that you allow for 8 inches of soil on top to plant in.
- The first layer in the trench should be an inch or so of green compostable material--kitchen scraps, grass clippings, leaves, manure, etc.
- Now layer in your wood--larger trenches would start with logs, shallower trenches might only allow for branches and twigs. Just stack them progressively thinner as you go up, into a pyramidal hill or mound, wider at the base and narrower at the top, along the length of the bed. Compact the logs and branches as tightly as possible.
- Add an inch or two of green waste along the sides of the bed as you build up. You essentially want to encase the wood layer on all sides with more easily compostable material to assist in decomposition.
- Once your wood layer is complete, add a 2 inch layer of green waste on top, filling in any cracks in the wood layer as well.
- Finally, cover all the layers with 8 inches of soil, using the reserved soil dug from the bed. If necessary, amend your backfill soil with compost, coco coir, manure, etc. as preferred.
- Your bed is now ready to be planted and mulched!
Hugelkultur Tips for Success
- Choose old, dry, partially decomposed wood whenever possible.
- Don't use wood from black walnut, sugar maple, red oak, black locust, American elm, tree of heaven (the horribly invasive Ailanthus), American sycamore, cottonwood, black cherry, Southern waxmyrtle, eucalyptus, or manzanita. These plants contain chemicals that can prevent other plants from growing. While those compounds will eventually disappear once the wood is fully composted, it still a good idea not to include them. Ditto for anything notably more resistant to decomposition, like cedar.
- You'll still need to water. However, as the wood decomposes it will act like a sponge, helping the bed to retain moisture.
- You don't have to create an actual mound, especially in a walled, raised bed. Just use the hugel layers at the bottom of the bed in an even layer instead of a pyramid shaped mound, and cover with an even 8 inch layer of soil. This saves on the amount of soil you'll need to fill the bed. For example, in my 4x8x1 raised bed it would have taken 32 cubic feet of soil to fill. At roughly $3 per cubic foot for bagged topsoil (the going rate here--whatever happened to 99 cents a bag?), that's about $100, not accounting for more expensive soil amendments and the effort to drag it all home. So even just filling the bottom 4 inches with hugel layers saves me at least $30 right off the bat, got rid of all the leaves and garden trimmings from my spring cleanup, and will improve my nasty soil over time. Well worth it, in my mind.
Final Thoughts on My Hugelkultur Experience
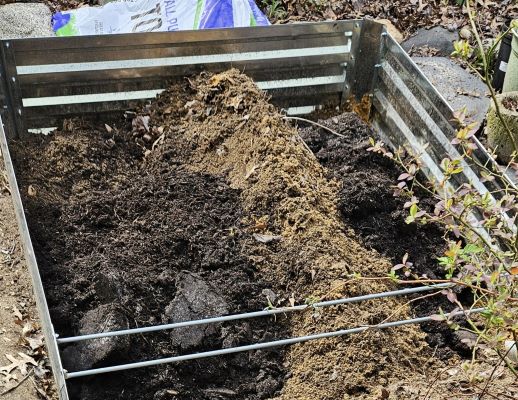
My original intention was to have that 4x 8 foot bed mounded up at least two feet, which would have allowed me to use both sides of the mound and get more plants to the square foot. Unfortunately, my wood and branch collecting was hampered by sheer laziness and the early arrival of the community landscape crew. That resulted in not having near enough wood on the day I was ready to build the bed, so I just went with what I had, and only worked on the center of the front half of the bed. Think of what a random pile of firewood or brush looks like compared to the size after it's neatly stacked or bundled--once it's compressed it looks like a lot less. In this case, more is better, as you can always pile a little higher if you have a bit too much.
I've also always heard that you never put uncomposted material into an area in which you're planting, as it will use the nitrogen in the soil to decompose, making it unavailable for plants. This system avoids that by incoporating the green waste around the wood to help it decompose, and by having the 8 inches of soil on top in which to plant. If you don't want to plant immediately you can leave the mounds to decompose on their own until next year and use less soil cover. But what gardener can wait that long?
The mounds will eventually flatten down--a 6 foot high mound will be reduced to about 2 feet high once everything is fully decomposed. You may have some sinking in walled raised beds if you don't mound up, but you can always top off as needed. (That's one reason you want to fill your hugel layers tightly). Or, you can dig out that nice, organic soil to use where it's needed elsewhere, and hugel all over again. If I had room, I would. Hmmm...I don't know, do I really need room for that lawn chair? I can eat berries and tomatoes standing up......


